Absent much other information freely available on the web, here is
A Possibly Wrong Primer on Musical Instrument Engraving
I say possibly wrong because it is written by myself (introduction) and my partner at the time Bianca (the more helpful bit with tool links), and between the two of us we barely constitute an amateur at the craft/art of musical instrument engraving. So proceed at your own risk. If you do not believe as I do that some information (even if partially wrong) is better than no information, stop reading now and feel free to get upset.
You’ve been warned.
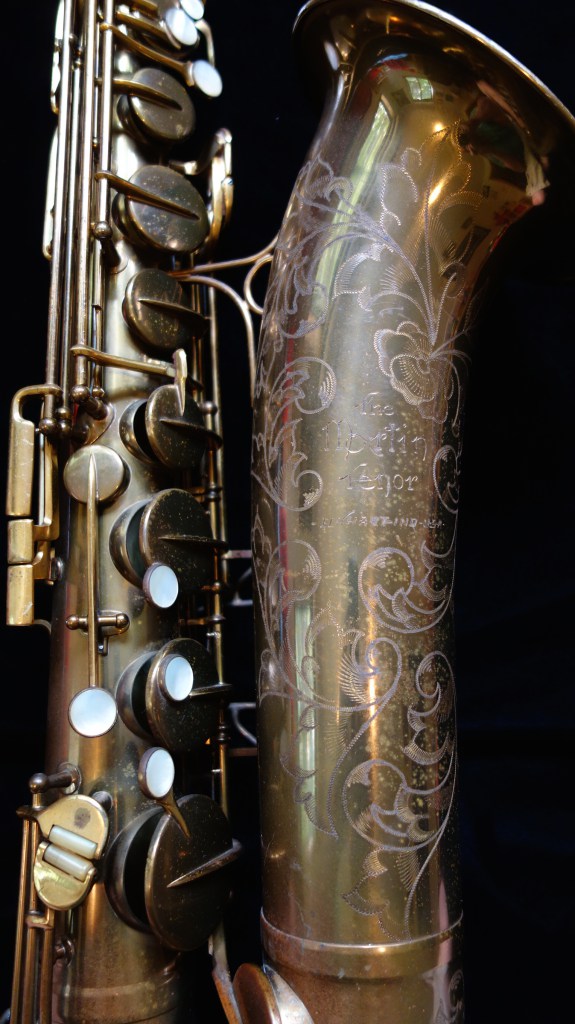
Musical instrument engraving is the mostly-bygone craft of hand-engraving a pattern on a musical instrument. At first, this was done in the straight cut style common to other types of engraving that survives today in jewelry and gun engraving. Later on, the faster and cheaper and easier to teach “wiggle” or “wriggle” cut was used, and now in modern times engraving is often done by machine, laser, or acid-etched. Straight cut hand engraving is still in use elsewhere and able to be learned in classes and online, while the “wriggle” style is largely restricted to musical instrument engraving and information is very hard to come by. Until now, I guess- although this information is possibly wrong.
The very basics: Engraving is done on saxophones by pushing a cutting tool through the brass by hand. The cuts taken are not very deep, but the sharpness of the tool combined with the force necessary to make a clean cut in brass combined with the unwieldy shape of a saxophone mean that great care must be taken to not slip and put a graver (as the engraving tools are called) through your wrist. Wriggle cuts are made in a walking/wiggling motion not unlike the motion you make when moving heavy furniture across the floor by “walking” it edge to edge. Straight cuts are made by pushing a graver to create a shallow trench in the metal. Straight cuts are much, much harder to do well.
Sharp tools cut to the correct angles are paramount. The sharpness of the edge will not only make the cuts easier to make and therefore the job of engraving easier, but the shape of the cutting edge of the graver will be reproduced in the cuts themselves, and a straight and razor sharp edge will leave a highly desirable mirror-like finish to the cut.
One often overlooked part of this equation is the artistry involved. The physical part- the tools, the making of the cuts- can be learned by most anyone, but the artistic ability you do or don’t possess will be the determining factor in how good your end product can look once you have mastered the physical part. If you can’t draw a nice engraving pattern on paper, you can’t do it on metal. If you can’t make a straight line or a concentric circle with a pencil, you can’t do it with a graver. So my advice would be to start out as at least a mediocre artist, and in addition to practicing engraving itself you should be spending a lot of time drawing. The best engravers had immense volumes of notebooks and doodle pads that they worked out ideas upon, and the beauty of the art therein is a good indicator of what they put on instruments.
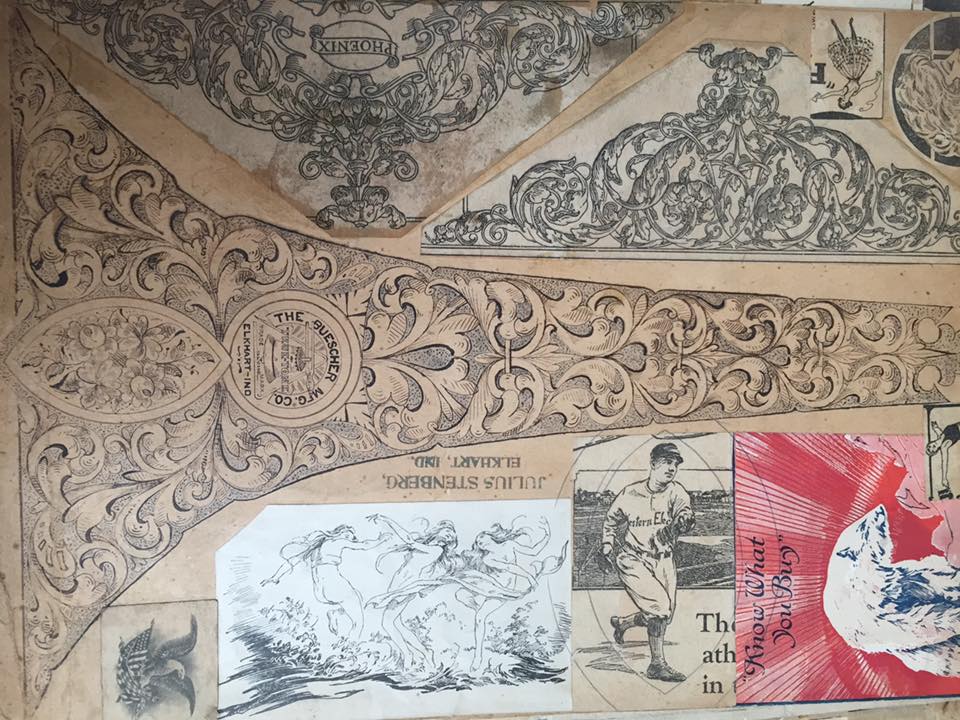
Here is an example of that in a page from Julius Stenberg’s notebook. Julius was one of two brothers who engraved for Conn, and Julius’ work is widely considered to be among the best. This photo comes from Ray Noguera’s Musical Instrument Engraving page on Facebook, which you should definitely check out if you are interested in engraving at all.
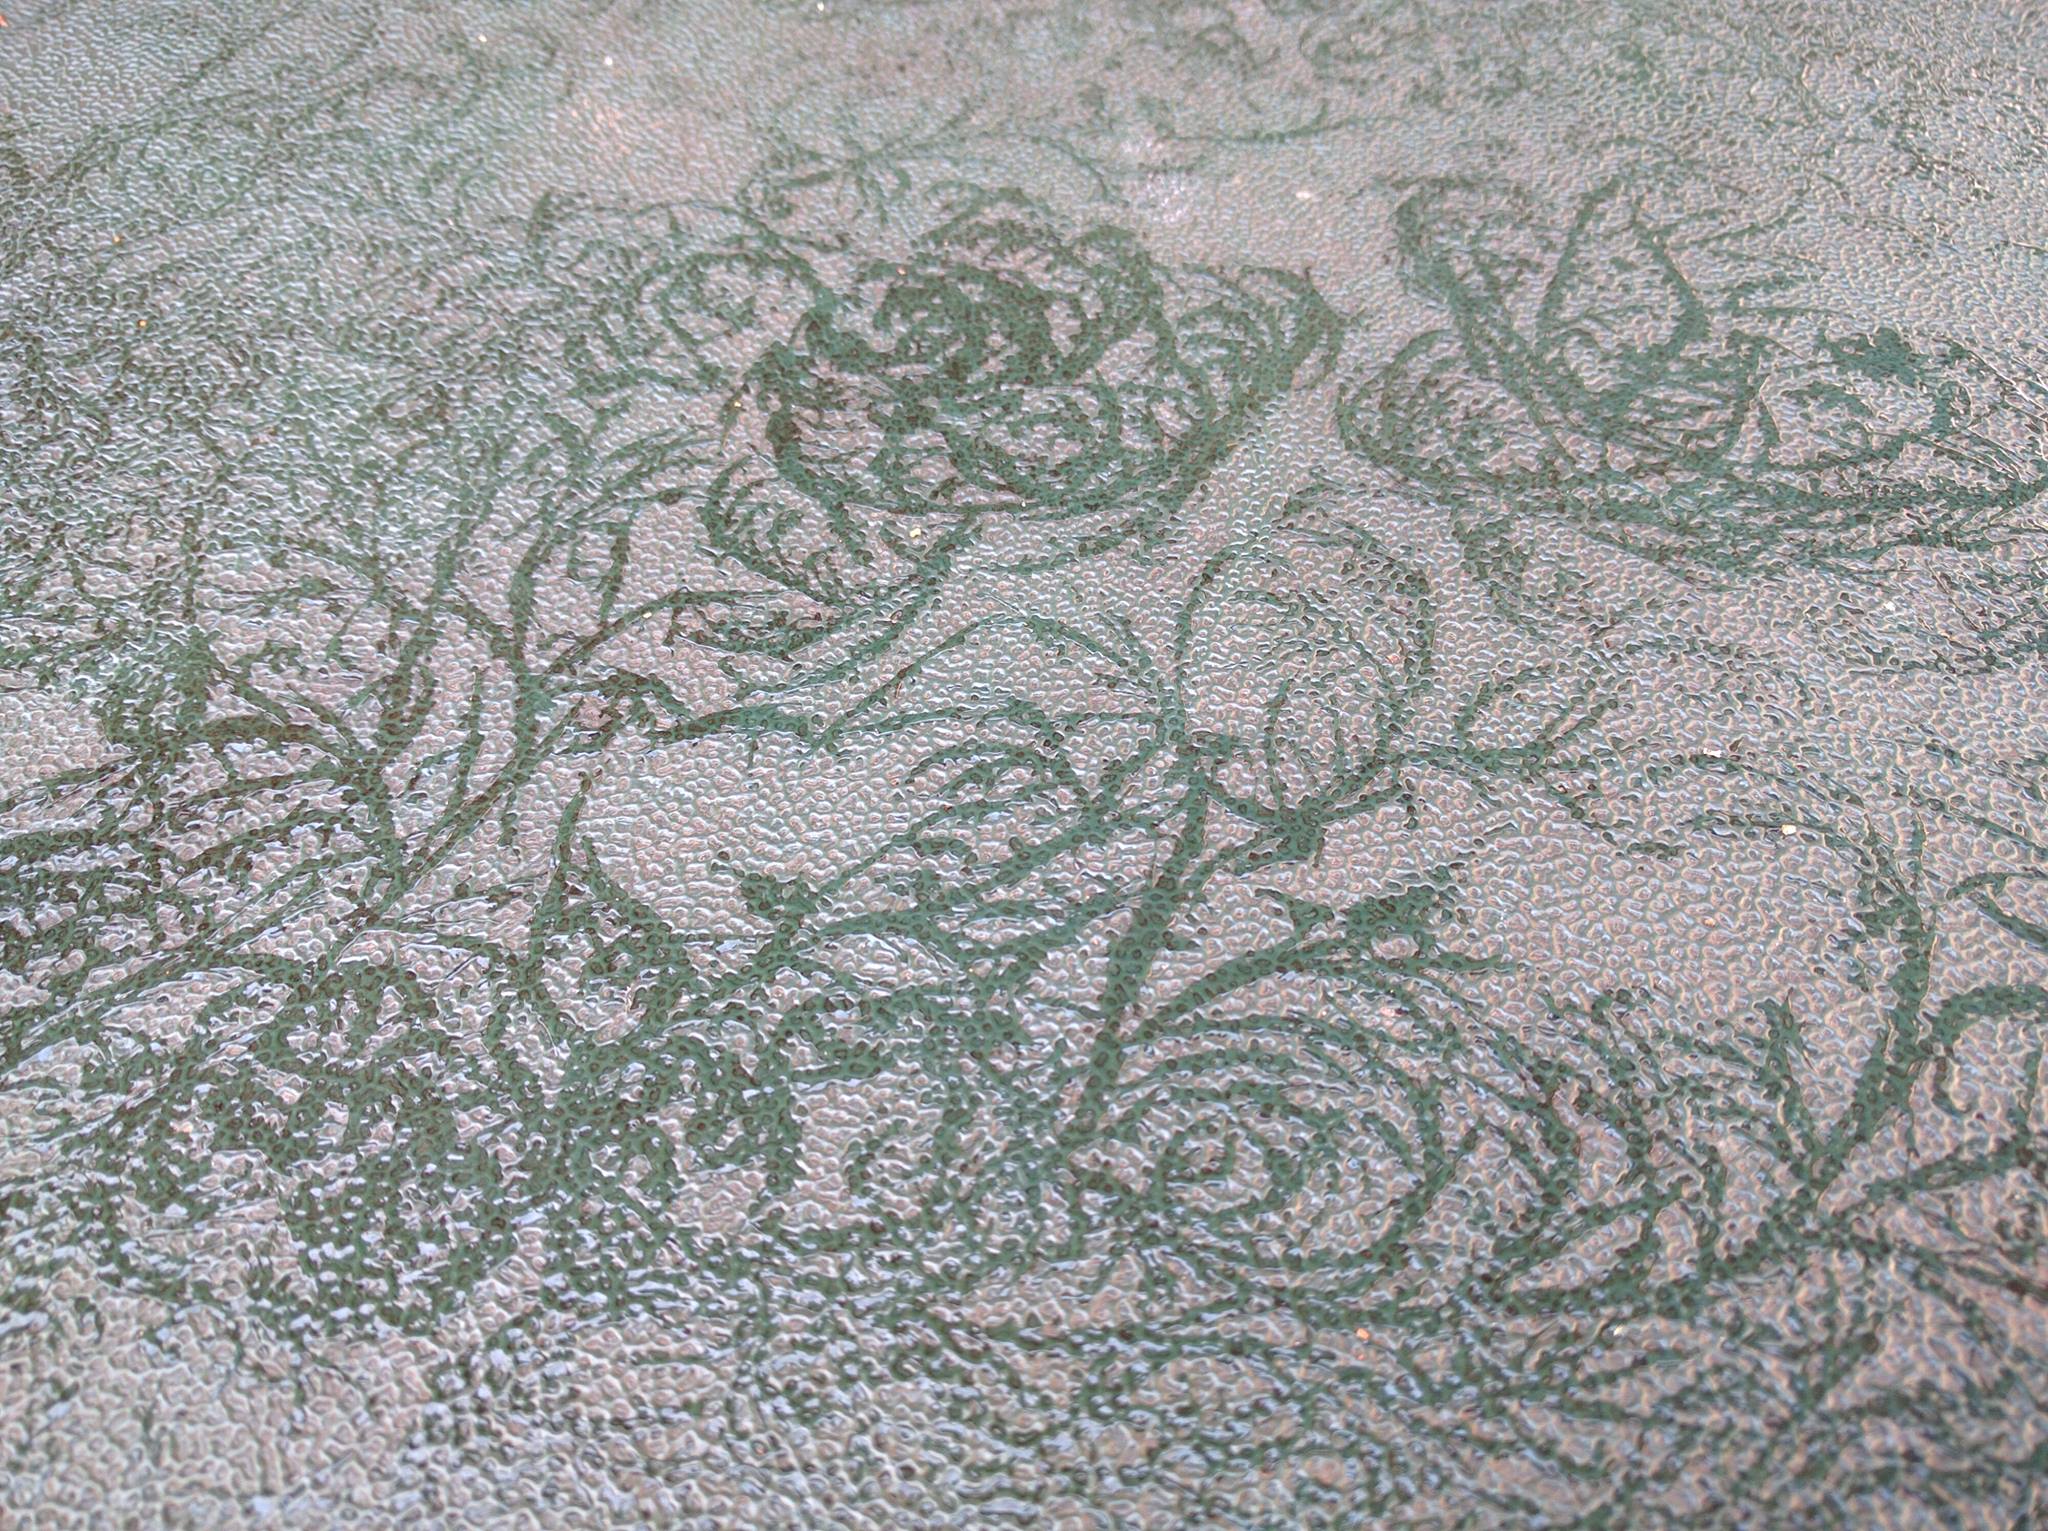
You may notice that many of the motifs found in traditional engraving have an organic or natural feel to them- whether overtly in flowers and butterflies or more subtly in the shapes and designs that feel familiar to us in our observations of the physical world. The photo above is some frost on the top of a garbage can lid (of all places) outside my house.
A working knowledge of art styles is necessary to be a good engraver, and likely an in-depth knowledge would be highly beneficial. Traditional engraving includes styles such as rococo and art-deco, and of course being an art form as much as a craft there is room for innovation, as seen in the modernist style that can be seen on some Benedikt Eppelsheim instruments.
See the below videos for examples of musical instrument engraving being done. The first video of the Selmer assembly plant in Elkhart is very good in particular. There are a few more videos out there, not all of which applies to traditional music instrument engraving, but these should give you a good starting point.
Details: What To Buy To Get Started
My (partner at the time) Bianca has been slowly (in between raising our two young children) teaching herself some engraving. We live in the boonies, so she has mostly taught herself and gotten a healthy serving of free advice from Jaice Dumars and Ray Noguera and online forums and reading up on it etc. Someone asked her a little while ago for some advice on starting, and she gave me permission to reprint that email for you guys here. Keep in mind- and she instructs me to say this in caps- SHE IS A BEGINNER. But absent the amount of free advice you can get for many other areas of this craft, perhaps you will find this useful. Bianca’s letter (written in 2015) follows:
“Hi Mandy,
Sorry it’s taken me so long to get back to you… I have two high-energy kids (a one year old and three year old), so getting time to sit at the computer is a bit of a challenge right now! Thanks for your patience.
Assortment of gravers:
Flat sized 38, 40 (my personal favorite), 42, 46, 49
Round sized 52, 56, 60, 63
Point/onglette gravers (mainly you “push” these for straight lines/drawings), size 0 and 3 or 5 (the sizing on these are confusing, different vendors label them differently; this book talks about jewelry engraving but has some good tips on sizing)
Liners (these are the ones that are measured by width/number of lines that you mentioned in your original email): there are SO many to choose from, would recommend just getting a few to start with and then adding to your collection as needed for vintage re-engraving. The sizes I have are 8/4, 10/6, 12/8, 12/16.
Also, whenever you order your gravers, don’t forget to order handles as well! Try out different shapes to see what feels comfortable to you.
http://riograndeblog.com/2012/06/gravers-handles-mark-nelsons-tips-on-successful-graver-handle-installation/
Good sites to order gravers from:
http://www.gesswein.com/c-182-gravers-liners-handles.aspx
Other tools:
If you can afford it, or even if you can just put it on a credit card, a Power Hone is SOOOO worth it. It’ll help you sharpen the gravers consistently every time, which is super important to avoid slippage.
For broad lines, chisels (like for woodworking) are what I use, but I’m not sure if this is “correct”. I don’t think engraving really has right or wrong ways of doing things, as long as it’s comfortable for the engraver and the work ends up looking good. For chisels I’d get a sharpening stone, since the Power Hone might wear out too quickly with the broad edges.
Sharpening info:
You want the “face” of the graver to be sharpened to a 45 degree angle, and the “heel” to a 15 degree angle (the heel only needs to be 1/4 of a millimeter; doing this on a round graver is super tricky, but on flat gravers it’s easy) Don’t sharpen the heel of a liner, since you want those lines to show up!
A bench grinder is useful for grinding down the face to a small surface area so you don’t wear out your sharpening setup too much (and also to cut down on sharpening time).
Books:
Good sites for visual inspiration:
http://www.engravingschool.com/
http://www.saxpics.com/ (great for copying classic designs)
I hope the above information helps! Please let me know if you have any additional questions. I’ll try to answer to the best of my knowledge (I’m just starting out on this journey!) and will also try to write back as quickly as possible.smile emoticon
Good luck!
“